
Tuesday, November 25, 2008


Tuesday, September 23, 2008
Assignment No.1
1.) Explain the cirumstances under which a token-ring netwrok is more effective than an Ethernet network.
A token ring is very effective under high sustained load, as no collisionscan occur and each slot may be used to carry a message, providing highthroughput. A token ring is less effective when the load is light (tokenprocessing takes longer than bus access, so any one packet can take longerto reach its destination), or sporadic.
http://www.arl.wustl.edu/~fredk/Courses/cs422/sp00/Answers
2.) Although security issues were not mentioned in this chapter, every network owner must consider them. Knowing that open networks all data to pass to every node, describe the posssible security concerns of open network achitectures. include the implicatiions of passing logon procedures, user IDs, and passwords openly on the network.
Content located on the Network may be the property of another person.
All information, data, text, software, music, sound, images, sketches, diagrams, photographs, graphics, renderings, CAD files, video, messages or any other materials whatsoever (collectively, "Content"), however posted to, maintained on, or transmitted via the Network, is the sole responsibility and property of the person from which such Content originated (the “Author”). This means that the Author, and not the Network or AFH, is entirely responsible for all Content that he or she uploads, posts, or transmits via the Network. In the event any Content is deemed illegal under applicable law, we will cooperate fully with applicable authorities in removing such Content and identifying its Author.
This type of network architecture are openly vulnerable for the possible malicious intrusions like worms, viruses and other malicious programs. Malicious person entering a network to damaged the entire system can easily passed causing great unfavourable effect. Passing logon procedure can be now favourable to the someone whose will is to destruct, they can now easily alter and use open information for their own purpose that against to the rights of the people all over the network.
The development of highly sophisticated computer technology causes the network security experts to create a more secure and safety measures for the private information but as this open network be implemented the whole system must be publicly accessed and the information security are wholly responsibility of someone who is the owner.
3. )Remembering the discussion of deadlocks, if you were designing a networked system, how would you manage the treat of deadlocks in your network? Consider all of the following: prevention, detection, avoidance, and recovery.
Prevention -
The importance of computer networking to achieve resource sharing and data sharing is widely recognized. Local networking to achieve high performance and reliability is inevitable for the future. As cost of logic and memory decreases, the cost of communications resources become increasingly significant and these resources must be increasingly shared. This heightens the possibility of deadlocks due to this sharing.
- their must be a mutual exclusive access in the network.
- their must be a condition for holding non-sharable resources.
- any request for certain files inn the network must be allocated, but it cannot request another resources unless it releases the resource that it holds.
- before requesting resources, we first check wheter they arre available or not to prevent hold and wait state.
Avoidance-
In an apparatus having a network including successive stages of cross-point switches which collectively interconnect a plurality of nodes external to said network, wherein at least one message is carried between one of the nodes and one of the cross-point switches over a route through said network, a method for preventing routing deadlocks from occurring in the network which comprises the steps of: creating a graphical representation of the network; searching for the existence of cycles within the graphical representation; partitioning the graphical representation into at a first subgraph and a second subgraph if cycles exist in the graphical representation; searching for the existence of edges directed from the first subgraph to the second subgraph; and removing the edges directed from the first subgraph to the second subgraph. Preferably the step of partitioning the network into at a first subgraph and a second subgraph is performed such that the first subgraph and the second subgraph have an equal number of vertices, a number of directed edges from the first subgraph to the second subgraph is minimized so as to minimize the number of routes prohibited, and a set of partition constraints are satisfied. The method is recursively applied to the first subgraph and then the second subgraph, thereby removing all of the deadlock prone cycles in the network while minimizing the number of routes prohibited due to remove edges.
Detection -
The problem of detecting process deadlocks is common to transaction oriented computer systems which allow data sharing. Several good algorithms exist for detecting process deadlocks in a single location facility. However, the deadlock detection problem becomes more complex in a geographically distributed computer network due to the fact that all the information needed to detect a deadlock is not necessarily available in a single node, and communications may lead to synchronization problems in getting an accurate view of the network state.
Two algorithms are then presented for detecting deadlocks in a computer network which allows processes to wait for access to a portion of a database, or a message from another process. The first algorithm presented is based on the premise that there is one control node in the network, and this node has primary responsibility for detecting process deadlocks. The second, and recommended, algorithm distributes the responsibility for detecting deadlocks among the nodes in which the involved processes and resources reside. Thus a failure of any single node has limited effect upon the other node in the network.
Recovery-
Routing algorithms used in wormhole switched networks must all provide a solution to the deadlock problem. If the routing algorithm allows deadlock cycles to form, then it must provide a deadlock recovery mechanism. Because deadlocks are anomalies that occur while routing, the deadlock recovery mechanism should not allocate any expensive hardware resources for the sake of handling such a rare event. Rather, it should only dedicate a minimal set of required resources to the recovery process in order to engage most of the hardware resources to the task of routing normal packets. This paper proposes a new deadlock recovery mechanism to be used with the True Fully Adaptive Routing algorithm. The new deadlock recovery mechanism takes advantage of the concept behind wormhole switching. The scheme is efficient in terms of hardware requirements, causes fewer deadlocks and can compete with other expensive deadlock recovery schemes.
4.)Assuming you had sufficient funds to upgrade only one component for a system with which you are familiar, explain which component you would choose to upgrade to improve overall performance, and why?
A wireless Ethernet bridge, because it converts a wired Ethernet device for use on a wireless computer network. Wireless Ethernet bridges and USB adapters are both sometimes called wireless media adapters as they enable devices for WiFi utilizing Ethernet or USB physical media. Wireless Ethernet bridges support game consoles, digital video recorders and other Ethernet-based consumer devices as well as ordinary computers.
True network bridge devices like the WET54G do not require device driver software installation in order to function, simplifying installation. Instead, network settings for the WET54G can be made through a browser-based administrative interface.
Like USB adapters, wireless Ethernet bridges can draw their power from the main cable connected to the host device. Ethernet bridges require a specialized Power over Ethernet (PoE) converter to make this work, however, whereas this functionality is automatic with USB. Without a PoE add-on, wireless Ethernet bridges need a separate power cord.
Wirelss Ethernet bridges commonly feature LED lights. The WET54G, for example, displays lights for power, Ethernet and Wi-Fi status.
Thursday, January 31, 2008
DVD Recording procedure
Burn DVD
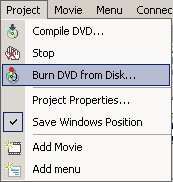
Menu: Project - Burn DVD from disk
This is the last step in the DVD creation process.
With our DVD Project having been Compiled, there are a set of files that DVD-lab has prepared for you in the Output folder as set in the Compile process. At this point, the DVD Author has choices as to how to convert this set of files into a DVD master disc. You can either use the DVD-lab built-in recording module or you can choose to use a third party DVD recording software such as Nero, Prassi, Gear, etc...
It is common that you are supplied with a DVD recording software that was bundled with your DVD-R/DVD+R burner. This software may be better optimized for your particular drive. The DVD-lab built-in DVD recording module is a general ASPI writing application and should work fine. In an ideal world, either one would work equally well.
DVD-lab Disc record window
The DVD-lab Disc record window is automatically detached. That means it runs as a separate process independent from DVD-lab, you could even close DVD-lab and the recording will continue.
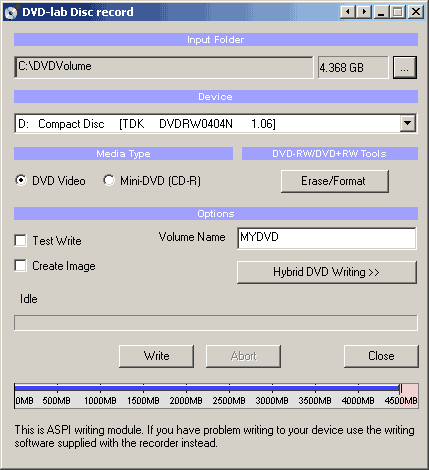
Here are some of the parameter choices for the DVD-lab Disc record window.
Input Folder
The Input Folder is the same as the Output folder in Compile. That means this is the folder where the VIDEO_TS and AUDIO_TS folders are expected to be.
Device
The DVD recording drive you want to write to, presented as the O/S recognizes it.
Media Type
Set if you want to burn DVD Video or a Mini-DVD.Mini-DVD is a DVD format burned on the CD-R. Obviously you can put far less data on a CD-R (about 700 MB) than on DVD (4.3 GB)
![]() The size indicator on the bottom can help you to determine how much data you can record to the disc. You have to keep your data below the red area.
The size indicator on the bottom can help you to determine how much data you can record to the disc. You have to keep your data below the red area.
![]() Note: While you will be able to play the CD-R on a computer not all standalone players will be able to play the Mini-DVD. In fact such format is not officially supported. The reason is that CD's have far less density of data so in order to play the large DVD video bitrate they have to spin much faster than DVD. Not all DVD drives in players are ready for this so the functionality to DVD files from CD-R is often simply disabled. However a number of Asian or re-branded Asian US models of players use a standard PC type of DVD drive which allows for fast spin of CD.
Note: While you will be able to play the CD-R on a computer not all standalone players will be able to play the Mini-DVD. In fact such format is not officially supported. The reason is that CD's have far less density of data so in order to play the large DVD video bitrate they have to spin much faster than DVD. Not all DVD drives in players are ready for this so the functionality to DVD files from CD-R is often simply disabled. However a number of Asian or re-branded Asian US models of players use a standard PC type of DVD drive which allows for fast spin of CD.
DVD-RW/DVD+RW Tools
For those using a re-writable media, the DVD-RW needs to be formatted if they were already used - click the Erase/Format button to do this. The more common DVD-R media do not need any formatting.
The DVD-RW and +RW needs to be finalized after writing. This takes quite a large amount of time on RW media. Please be patient until this important process is completed.
Options
Test Write checkboxUse this option by checking the Test Write checkbox to have DVD-lab do a trial run at writing a DVD. This option does not write anything to disk or your hard drive, it merely goes through the motions to insure that all of the content and menus within the DVD project are correctly prepared and defined.
Volume Name inputEnter here a name for the DVD volume that will appear when placed in a computer drive. A standalone DVD player just ignores this.
Create Image checkboxYou can choose to have DVD-lab create a large file on your hard drive which is an the image of a DVD disc instead of burning. The result will be one big IMG file. That IMG file can be used with a number of third party DVD recording software to replicate a DVD disc from this image file, as many times as you like, whenever you like. Some software will look for a ISO file name extension, if so, just rename the file to a .ISO extension. This method has the advantage of speed as the DVD image is all prepared on your hard drive, it is then a just matter of how fast your DVD burner drive will burn that image.
Hybrid DVD Writing buttonYou can add additional files and folders to the DVD master disc with the Hybrid DVD Writing option. What this option will do is setup an alternate filesystem on the DVD master disc which is called an ISO filesystem. The ISO format is what a standard CD uses while the DVD video is in UDF/ISO. This is perfectly DVD "legal" as the DVD player doesn't know or care about this ISO filesystem's contents, it just looks for a UDF filesystem.
It doesn't matter at all what the content or nature of these files are. They are just files, not Windows or Mac or Linux files, just files. As they are recorded into the ISO file system domain, they are available on any computer with a DVD drive. This offers the DVD-lab Author some creative options for bonus content that would be available to a computer user on any O/S that supports a DVD drive.

For example, you can create an autorun project in Multimedia Builder and record it to DVD as an extra feature when used on PC. HTML based content may be placed here as well, be sure to indicate to your computer users where to find your HTML starting page (ex: index.html).
Note: The space used by the Hybrid DVD Writing option counts in the entire Project space value. You only get so much space on a DVD (4.7G), this option uses part of that. Do the math to be sure you have room for this extra area.
Write buttonAs expected, click this button to start the DVD writing (burn) process.
Note: It is not recommended to do any work on the computer during DVD writing. Things like reading/writing to hard-drive may easily ruin your DVD-R. Try to let the burning process be the only thing your computer is running until it is completed.
Congratulations - now it is up to you to enjoy the DVD.
Wednesday, January 23, 2008
CPU type Package
FC-LGA4 Package TypeThe FC-LGA4 package is used with Pentium® 4 processors designed for the LGA775 socket. FC-LGA4 is short for Flip Chip Land Grid Array 4. FC (Flip Chip) means that the processor die is on top of the substrate on the opposite side from the LAND contacts. LGA (LAND Grid Array) refers to how the processor die is attached to the substrate. The number 4 stands for the revision number of the package.This package consists of a processor core mounted on a substrate land-carrier. An integrated Heat Spreader (IHS) is attached to the package substrate and core and serves as the mating surface for the processor component thermal solution such as a heatsink.You may also see references to processors in the 775-LAND package. This refers to the number of contacts that the new package contains that interface with the LGA775 socket.The pictures below include the LAND Slide Cover (LSC). This black cover protects the processor contacts from damage and contamination and should be retained and placed on the processor whenever it is removed from the LGA775 socket.


FC-PGA2 Package TypeFC-PGA2 packages are similar to the FC-PGA package type, except these processors also have an Integrated Heat Sink (IHS). The integrated heat sink is attached directly to the die of the processor during manufacturing. Since the IHS makes a good thermal contact with the die and it offers a larger surface area for better heat dissipation, it can significantly increase thermal conductivity. The FC-PGA2 package is used in Pentium III and Intel Celeron processor (370 pins) and the Pentium 4 processor (478 pins).


FC-PGA Package TypeThe FC-PGA package is short for flip chip pin grid array, which have pins that are inserted into a socket. These chips are turned upside down so that the die or the part of the processor that makes up the computer chip is exposed on the top of the processor. By having the die exposed allows the thermal solution can be applied directly to the die, which allows for more efficient cooling of the chip. To enhance the performance of the package by decoupling the power and ground signals, FC-PGA processors have discrete capacitors and resistors on the bottom of the processor, in the capacitor placement area (center of processor). The pins on the bottom of the chip are staggered. In addition, the pins are arranged in a way that the processor can only be inserted one way into the socket. The FC-PGA package is used in Pentium® III and Intel® Celeron® processors, which use 370 pins.


OOI Package TypeOOI is short for OLGA. OLGA stands for Organic Land Grid Array. The OLGA chips also use a flip chip design, where the processor is attached to the substrate facedown for better signal integrity, more efficient heat removal and lower inductance. The OOI then has an Integrated Heat Spreader (IHS) that helps heatsink dissipation to a properly attached fan heatsink. The OOI is used by the Pentium 4 processor, which has 423 pins.


FC-PGA Package TypeThe FC-PGA package is short for flip chip pin grid array, which have pins that are inserted into a socket. These chips are turned upside down so that the die or the part of the processor that makes up the computer chip is exposed on the top of the processor. By having the die exposed allows the thermal solution can be applied directly to the die, which allows for more efficient cooling of the chip. To enhance the performance of the package by decoupling the power and ground signals, FC-PGA processors have discrete capacitors and resistors on the bottom of the processor, in the capacitor placement area (center of processor). The pins on the bottom of the chip are staggered. In addition, the pins are arranged in a way that the processor can only be inserted one way into the socket. The FC-PGA package is used in Pentium® III and Intel® Celeron® processors, which use 370 pins.
OOI Package TypeOOI is short for OLGA. OLGA stands for Organic Land Grid Array. The OLGA chips also use a flip chip design, where the processor is attached to the substrate facedown for better signal integrity, more efficient heat removal and lower inductance. The OOI then has an Integrated Heat Spreader (IHS) that helps heatsink dissipation to a properly attached fan heatsink. The OOI is used by the Pentium 4 processor, which has 423 pins.
PGA Package TypePGA is short for Pin Grid Array, and these processors have pins that are inserted into a socket. To improve thermal conductivity, the PGA uses a nickel plated copper heat slug on top of the processor. The pins on the bottom of the chip are staggered. In addition, the pins are arranged in a way that the processor can only be inserted one way into the socket. The PGA package is used by the Intel Xeon™ processor, which has 603 pins.


PPGA Package TypePPGA is short for Plastic Pin Grid Array, and these processors have pins that are inserted into a socket. To improve thermal conductivity, the PPGA uses a nickel plated copper heat slug on top of the processor. The pins on the bottom of the chip are staggered. In addition, the pins are arranged in a way that the processor can only be inserted one way into the socket. The PPGA package is used by early Intel Celeron processors, which have 370 pins.


PPGA Package TypePPGA is short for Plastic Pin Grid Array, and these processors have pins that are inserted into a socket. To improve thermal conductivity, the PPGA uses a nickel plated copper heat slug on top of the processor. The pins on the bottom of the chip are staggered. In addition, the pins are arranged in a way that the processor can only be inserted one way into the socket. The PPGA package is used by early Intel Celeron processors, which have 370 pins.
S.E.C.C. Package TypeS.E.C.C. is short for Single Edge Contact Cartridge. To connect to the motherboard, the processor is inserted into a slot. Instead of having pins, it uses goldfinger contacts, which the processor uses to carry its signals back and forth. The S.E.C.C. is covered with a metal shell that covers the top of the entire cartridge assembly. The back of the cartridge is a thermal plate that acts as a heatsink. Inside the S.E.C.C., most processors have a printed circuit board called the substrate that links together the processor, the L2 cache and the bus termination circuits. The S.E.C.C. package was used in the Intel Pentium II processors, which have 242 contacts and the Pentium® II Xeon™ and Pentium III Xeon processors, which have 330 contacts.


S.E.C.C.2 Package TypeThe S.E.C.C.2 package is similar to the S.E.C.C. package except the S.E.C.C.2 uses less casing and does not include the thermal plate. The S.E.C.C.2 package was used in some later versions of the Pentium II processor and Pentium III processor (242 contacts).


S.E.P. Package TypeS.E.P. is short for Single Edge Processor. The S.E.P. package is similar to a S.E.C.C. or S.E.C.C.2 package but it has no covering. In addition, the substrate (circuit board) is visible from the bottom side. The S.E.P. package was used by early Intel Celeron processors, which have 242 contacts.


S.E.C.C.2 Package TypeThe S.E.C.C.2 package is similar to the S.E.C.C. package except the S.E.C.C.2 uses less casing and does not include the thermal plate. The S.E.C.C.2 package was used in some later versions of the Pentium II processor and Pentium III processor (242 contacts).
S.E.P. Package TypeS.E.P. is short for Single Edge Processor. The S.E.P. package is similar to a S.E.C.C. or S.E.C.C.2 package but it has no covering. In addition, the substrate (circuit board) is visible from the bottom side. The S.E.P. package was used by early Intel Celeron processors, which have 242 contacts.
Tuesday, January 15, 2008
Types of form factor..
Form factors
As mentioned earlier, motherboards are classified by form factors. Form factors essentially define the layout of the actual motherboard including the dimensions, component positioning, mounting holes, number of expansion slots, and so on. There are several different types of form factors including:
AT/Baby AT
ATX
LPX
BTX
NLX
The following sections will outline some of the characteristics of each of the form factors listed above, starting with the AT/Baby AT.
AT/Baby AT
The Advanced Technology (AT) was the original IBM form factor design, on which the processor, memory and expansion slots were all arranged in a straight line as shown in Figure A.
Figure A
AT was the original IBM form factor design.
This posed a problem for full length expansion cards because the height of the processor interfered with proper card installation. In addition, heat dissipation from the processor sometimes caused problems for the expansion cards. The AT form factor also caused problems with the drive bays. The width of the board was 12" wide and 13.8" deep which overlapped with the space required for drive bays.
The Baby AT was a smaller version of the AT, only 9" wide and 13" deep, with newer, smaller components. It was a more compact board, but had the same drawbacks as the AT. In a home PC this is rarely an issue. However, in servers, many expansion cards are full length. Traditionally servers are not designed around the Baby AT form factor.
As motherboards have evolved over the years, the AT/Baby AT form factors have become obsolete.
ATX
The ATX form factor was designed to overcome the problems associated with the AT/Baby AT form factors. As shown in Figure B, the ATX component layout is different from the AT. In the ATX form factor, the processor and memory are arranged at a right angle to the expansion slots, allowing room for the use of full-length expansion cards. In the newer computers, the combined height of the processor, heat sink, and cooling fan make it possible to insert full length cards in any other form factor, and most new computers (including servers) are built around the ATX form factor

The ATX form factor is different than that of the AT/Baby AT form factor
ATX motherboards also offer advanced power management features that make them ever more attractive to computer builders. For example, ATX motherboards offer a soft shutdown option, allowing the operating system to completely power down the computer without the user's having to press the power switch.
A full size ATX board is 12" wide and 9.6" deep. There is also a smaller version referred to as the Mini-ATX board, is 11.2" wide and 8.2" deep.
MicroATX
The MicroATX, introduced by Intel in 1997, is a compatible variation to the ATX board outlined above. As the name would imply, the MicroATX is smaller than the standard ATX board because of the reduced number of I/O slots on the board. Due to the fact that it is smaller than the standard ATX board, the MicroATX form factor reduces the cost of computers and is often used in lower-cost systems.
FlexATX
The FlexATX form factor was released by Intel as an addition to the MicroATX. This form factor, which is smaller than the MicroATX, is designed for lower-end, smaller, consumer orientated systems. Some FlexATX boards do not even include expansion slots which mean expansion is only possible through USB or firewire ports.
LPX
The LPX form factor is not a standard one but a non-standard proprietary one sometimes found in desktop computer models (as opposed to towers or mini towers). This form factor is characterized by an expansion board that runs parallel to the motherboard. A riser card arrangement is used for expansion cards thereby allowing for smaller cases. The disadvantage is that this limits the number of expansion cards available.
LPX motherboards are typically integrated and most have the video and sound components built-in. However, due in part to the fact that the form factor is non-standardized, the ATX form factor is more popular.
BTX
Balanced Technology Extended (BTX) form factor was released in 2003 by Intel. Unlike other form factors, this one did not evolve from an older form factor. Instead, it was a completely new form factor.
As shown in Figure C, the BTX form factor allows for more integrated onboard components because it is larger than ATX. The airflow path is optimized by moving the memory slots and expansion slots. This allows the main system board components to use the same airflow thereby requiring fewer fans and reducing noise.

Balanced Technology Extended (BTX) form factor was released in 2003 by Intel.
The three motherboards included in the BTX form factor are outlined below.
PicoBTX - This is the smallest BTX motherboard form factor. It uses four mounting holes and one expansion slot.
microBTX - This form factor is slightly smaller than the regular BTX but larger than the PicoBTX. It uses seven mounting holes and four expansion slots.
BTX - Also referred to as regularBTX, is the largest BTX form factor. It uses up to ten mounting holes and supports a maximum of seven expansion slots.
NLX
NLX has been a form factor in use with desktops for quite some time. It is a compact form factor, often referred to as a "low-profile application". NLX motherboards are easily distinguished by the riser card to which the expansion cards connect. The riser cards allow from two to four expansion cards to be plugged in. These expansion cards sit parallel to the motherboard.
Servers with this form factor offer power that is similar to the larger traditional servers, but in the size of a VCR. The obvious benefit of the NLX form factor is that the bulk of a traditional server is reduced to a space-saving smaller server. Additionally, servers assembled in a rack mount case can be secured to a rack, which can itself be secured to the floor, providing better equipment safety.
Table A summarizes the form factors outlined above, including what they are typically used for and the maximum number of slots.
Table A

As mentioned earlier, motherboards are classified by form factors. Form factors essentially define the layout of the actual motherboard including the dimensions, component positioning, mounting holes, number of expansion slots, and so on. There are several different types of form factors including:
AT/Baby AT
ATX
LPX
BTX
NLX
The following sections will outline some of the characteristics of each of the form factors listed above, starting with the AT/Baby AT.
AT/Baby AT
The Advanced Technology (AT) was the original IBM form factor design, on which the processor, memory and expansion slots were all arranged in a straight line as shown in Figure A.
Figure A
AT was the original IBM form factor design.
This posed a problem for full length expansion cards because the height of the processor interfered with proper card installation. In addition, heat dissipation from the processor sometimes caused problems for the expansion cards. The AT form factor also caused problems with the drive bays. The width of the board was 12" wide and 13.8" deep which overlapped with the space required for drive bays.
The Baby AT was a smaller version of the AT, only 9" wide and 13" deep, with newer, smaller components. It was a more compact board, but had the same drawbacks as the AT. In a home PC this is rarely an issue. However, in servers, many expansion cards are full length. Traditionally servers are not designed around the Baby AT form factor.
As motherboards have evolved over the years, the AT/Baby AT form factors have become obsolete.
ATX
The ATX form factor was designed to overcome the problems associated with the AT/Baby AT form factors. As shown in Figure B, the ATX component layout is different from the AT. In the ATX form factor, the processor and memory are arranged at a right angle to the expansion slots, allowing room for the use of full-length expansion cards. In the newer computers, the combined height of the processor, heat sink, and cooling fan make it possible to insert full length cards in any other form factor, and most new computers (including servers) are built around the ATX form factor
The ATX form factor is different than that of the AT/Baby AT form factor
ATX motherboards also offer advanced power management features that make them ever more attractive to computer builders. For example, ATX motherboards offer a soft shutdown option, allowing the operating system to completely power down the computer without the user's having to press the power switch.
A full size ATX board is 12" wide and 9.6" deep. There is also a smaller version referred to as the Mini-ATX board, is 11.2" wide and 8.2" deep.
MicroATX
The MicroATX, introduced by Intel in 1997, is a compatible variation to the ATX board outlined above. As the name would imply, the MicroATX is smaller than the standard ATX board because of the reduced number of I/O slots on the board. Due to the fact that it is smaller than the standard ATX board, the MicroATX form factor reduces the cost of computers and is often used in lower-cost systems.
FlexATX
The FlexATX form factor was released by Intel as an addition to the MicroATX. This form factor, which is smaller than the MicroATX, is designed for lower-end, smaller, consumer orientated systems. Some FlexATX boards do not even include expansion slots which mean expansion is only possible through USB or firewire ports.
LPX
The LPX form factor is not a standard one but a non-standard proprietary one sometimes found in desktop computer models (as opposed to towers or mini towers). This form factor is characterized by an expansion board that runs parallel to the motherboard. A riser card arrangement is used for expansion cards thereby allowing for smaller cases. The disadvantage is that this limits the number of expansion cards available.
LPX motherboards are typically integrated and most have the video and sound components built-in. However, due in part to the fact that the form factor is non-standardized, the ATX form factor is more popular.
BTX
Balanced Technology Extended (BTX) form factor was released in 2003 by Intel. Unlike other form factors, this one did not evolve from an older form factor. Instead, it was a completely new form factor.
As shown in Figure C, the BTX form factor allows for more integrated onboard components because it is larger than ATX. The airflow path is optimized by moving the memory slots and expansion slots. This allows the main system board components to use the same airflow thereby requiring fewer fans and reducing noise.
Balanced Technology Extended (BTX) form factor was released in 2003 by Intel.
The three motherboards included in the BTX form factor are outlined below.
PicoBTX - This is the smallest BTX motherboard form factor. It uses four mounting holes and one expansion slot.
microBTX - This form factor is slightly smaller than the regular BTX but larger than the PicoBTX. It uses seven mounting holes and four expansion slots.
BTX - Also referred to as regularBTX, is the largest BTX form factor. It uses up to ten mounting holes and supports a maximum of seven expansion slots.
NLX
NLX has been a form factor in use with desktops for quite some time. It is a compact form factor, often referred to as a "low-profile application". NLX motherboards are easily distinguished by the riser card to which the expansion cards connect. The riser cards allow from two to four expansion cards to be plugged in. These expansion cards sit parallel to the motherboard.
Servers with this form factor offer power that is similar to the larger traditional servers, but in the size of a VCR. The obvious benefit of the NLX form factor is that the bulk of a traditional server is reduced to a space-saving smaller server. Additionally, servers assembled in a rack mount case can be secured to a rack, which can itself be secured to the floor, providing better equipment safety.
Table A summarizes the form factors outlined above, including what they are typically used for and the maximum number of slots.
Table A
Thursday, December 13, 2007
Windows 2000 Installation Procedure
How To Install Windows 2000 Professional
Installing Windows 2000 ProfessionalTo install Windows 2000 Professional, follow these steps:1.Start the installation by using one of the following methods:•Start from the Windows 2000 Professional installation CD-ROM. Make sure that the CD-ROM is set to start before the hard disk starts. Insert the CD-ROM, and then when you are prompted, press any key to start the Windows 2000 Professional Setup program.•Start from boot disks. Insert Disk 1, and then insert each of the remaining three floppy disks when you are prompted to do so. For additional information about creating boot disks for Windows 2000, click the article number below to view the article in the Microsoft Knowledge Base: 197063 (http://support.microsoft.com/kb/197063/EN-US/) How to Create Setup Boot Disks for Windows 2000•Start from within a current operating system. Insert the CD-ROM, and then, at a command prompt, type drive:\i386\winnt32.exe and then press ENTER, or if this is an installation on a computer that has no previous installation of Windows, type drive:\i386\winnt.exe and then press ENTER, where drive is the letter of the CD-ROM drive.2.Setup inspects your computer's hardware configuration and then begins to install the Setup and driver files. When the Microsoft Windows 2000 Professional screen appears, press ENTER to set up Windows 2000 Professional.3.Read the license agreement, and then press the F8 key to accept the terms of the license agreement and continue the installation.4.When the Windows 2000 Professional Setup screen appears, either press ENTER to set up Windows 2000 Professional on the selected partition, or press C to create a partition in the unpartitioned space.5.If you choose to install Windows 2000 Professional on a file allocation table (FAT) partition, specify whether you want to:•Leave the current file system intact.•Format the partition as FAT16.•Convert the existing file system to the NTFS file system.•Format the partition by using the NTFS file system.Press ENTER after you make your selection. Setup examines the existing hard disks and then copies the files that are needed to complete the installation of Windows 2000 Professional. After the files are copied, the computer restarts.Important Do not press a key to boot from your CD-ROM drive when your computer restarts.6.When the Windows 2000 GUI Mode Setup Wizard appears, click Next to start the wizard. Setup detects and installs such devices as a specialized mouse or keyboard.7.When the Regional Options dialog box appears, customize your installation of Windows 2000 Professional for locale, number format, currency, time, date, and language, if necessary. Click Next.8.In the Personalize Your Software dialog box, type your name and the name of your organization, and then click Next.9.In the Product ID dialog box, type the 25-character product key, and then click Next.10.In the Computer Name and Password dialog box, either accept the default name that Setup generates or assign a different name for the computer. When you are prompted for an administrative password, type a password for the Administrator account. (You can leave the box blank; however, this is not recommended.) Click Next.11.In the Date and Time Settings dialog box, set the correct date and time for your computer. You can also specify which time zone you are in and set the computer to automatically adjust the clock for daylight saving time. Click Next.12.Setup installs the networking software and detects your network settings. When the Network Settings dialog box appears, click either•Typical to set default network settings such as File and Print Sharing for Microsoft Networks, Client for Microsoft Networks, and TCP/IP protocol that uses Dynamic Host Configuration Protocol (DHCP), or•Custom to specify the network components that you require for your network environment,and then click Next.13.In the Workgroup or Computer Domain dialog box, specify the workgroup or the domain to join. If you indicate that you are part of a domain, specify your domain user name and password. Click Next.Setup installs the networking components.14.During the final stage of installation, Setup installs Start menu items, registers components, saves settings, and removes temporary files. When the Completing the Windows 2000 Setup Wizard dialog box prompts you to do so, remove the Windows 2000 CD-ROM, and then click Finish to restart the computer.15.After the computer restarts, click Next in the Welcome to the Network Identification Wizard dialog box.16.In the Users of This Computer dialog box, specify either that users must enter a user name and password or that you want Windows 2000 to automatically log on a specific user when the computer starts. Click Finish.When the Windows 2000 Professional desktop appears, the installation is complete.
Installing Windows 2000 ProfessionalTo install Windows 2000 Professional, follow these steps:1.Start the installation by using one of the following methods:•Start from the Windows 2000 Professional installation CD-ROM. Make sure that the CD-ROM is set to start before the hard disk starts. Insert the CD-ROM, and then when you are prompted, press any key to start the Windows 2000 Professional Setup program.•Start from boot disks. Insert Disk 1, and then insert each of the remaining three floppy disks when you are prompted to do so. For additional information about creating boot disks for Windows 2000, click the article number below to view the article in the Microsoft Knowledge Base: 197063 (http://support.microsoft.com/kb/197063/EN-US/) How to Create Setup Boot Disks for Windows 2000•Start from within a current operating system. Insert the CD-ROM, and then, at a command prompt, type drive:\i386\winnt32.exe and then press ENTER, or if this is an installation on a computer that has no previous installation of Windows, type drive:\i386\winnt.exe and then press ENTER, where drive is the letter of the CD-ROM drive.2.Setup inspects your computer's hardware configuration and then begins to install the Setup and driver files. When the Microsoft Windows 2000 Professional screen appears, press ENTER to set up Windows 2000 Professional.3.Read the license agreement, and then press the F8 key to accept the terms of the license agreement and continue the installation.4.When the Windows 2000 Professional Setup screen appears, either press ENTER to set up Windows 2000 Professional on the selected partition, or press C to create a partition in the unpartitioned space.5.If you choose to install Windows 2000 Professional on a file allocation table (FAT) partition, specify whether you want to:•Leave the current file system intact.•Format the partition as FAT16.•Convert the existing file system to the NTFS file system.•Format the partition by using the NTFS file system.Press ENTER after you make your selection. Setup examines the existing hard disks and then copies the files that are needed to complete the installation of Windows 2000 Professional. After the files are copied, the computer restarts.Important Do not press a key to boot from your CD-ROM drive when your computer restarts.6.When the Windows 2000 GUI Mode Setup Wizard appears, click Next to start the wizard. Setup detects and installs such devices as a specialized mouse or keyboard.7.When the Regional Options dialog box appears, customize your installation of Windows 2000 Professional for locale, number format, currency, time, date, and language, if necessary. Click Next.8.In the Personalize Your Software dialog box, type your name and the name of your organization, and then click Next.9.In the Product ID dialog box, type the 25-character product key, and then click Next.10.In the Computer Name and Password dialog box, either accept the default name that Setup generates or assign a different name for the computer. When you are prompted for an administrative password, type a password for the Administrator account. (You can leave the box blank; however, this is not recommended.) Click Next.11.In the Date and Time Settings dialog box, set the correct date and time for your computer. You can also specify which time zone you are in and set the computer to automatically adjust the clock for daylight saving time. Click Next.12.Setup installs the networking software and detects your network settings. When the Network Settings dialog box appears, click either•Typical to set default network settings such as File and Print Sharing for Microsoft Networks, Client for Microsoft Networks, and TCP/IP protocol that uses Dynamic Host Configuration Protocol (DHCP), or•Custom to specify the network components that you require for your network environment,and then click Next.13.In the Workgroup or Computer Domain dialog box, specify the workgroup or the domain to join. If you indicate that you are part of a domain, specify your domain user name and password. Click Next.Setup installs the networking components.14.During the final stage of installation, Setup installs Start menu items, registers components, saves settings, and removes temporary files. When the Completing the Windows 2000 Setup Wizard dialog box prompts you to do so, remove the Windows 2000 CD-ROM, and then click Finish to restart the computer.15.After the computer restarts, click Next in the Welcome to the Network Identification Wizard dialog box.16.In the Users of This Computer dialog box, specify either that users must enter a user name and password or that you want Windows 2000 to automatically log on a specific user when the computer starts. Click Finish.When the Windows 2000 Professional desktop appears, the installation is complete.
Windows 98 Installation Procedure
How to Install Windows 98 on a Computer
Determine Which Product to UseTo install Windows 98, you must have one of the following products: •The "Microsoft Windows 98 Upgrade" product. This upgrade product is available on CD-ROM. When you use the Windows 98 Upgrade version, you must have a copy of the previous version of Windows on CD-ROM or on floppy disks for the compliance-check procedure during Setup. Make sure that you have your qualifying version of Windows on CD-ROM or on floppy disks before you run Setup. Note that you must also have a Windows 98 Startup disk to install this product.For additional information about how to create a Windows 98 Startup disk, click the article number below to view the article in the Microsoft Knowledge Base:How to Create a Windows 98 Startup Disk that Supports FAT32•The "Microsoft Windows 98 for PCs Without Windows" product. This version is available on CD-ROM. A Windows 98 Startup disk is included with the product.Minimum Hardware Requirements to Install Windows 98The minimum hardware requirements include:•486DX 66-MHz or faster processor (Pentium recommended)•16 megabytes (MB) of memory (24 MB recommended)•195 MB of free hard disk space (the required space may vary from 120 MB to 295 MB, depending on your computer's configuration and the options you choose to install)•CD-ROM or DVD-ROM drive•3.5-inch high-density floppy disk drive•Video adapter and monitor that support VGA or higher resolution•Microsoft Mouse or compatible pointing deviceFor additional information about the minimum hardware requirements, click the article number below to view the article in the Microsoft Knowledge Base:Minimum Hardware Requirements for Windows 98System Updates, Device Drivers, and Other ConsiderationsCMOS Antivirus UtilityIt is important to disable any CMOS antivirus utility that is enabled on your computer before you run Setup. If you are not sure if this feature is enabled on your computer, view the documentation that is included with your computer, or contact the computer manufacturer.Drive Overlay SoftwareIf your computer uses drive overlay software to enable large hard disk support, the drive overlay software must be installed before you install Windows 98. To install the drive overlay software, view the documentation that is included with the software or contact the software manufacturer.System Updates and Device DriversTo ensure that your hardware and software is compatible with Windows 98, verify that you have the latest drivers, Basic Input Output System (BIOS), or patches for your hardware and software before you run Setup.If your computer uses proprietary hardware and you try to install Windows 98 on a clean hard disk, you may receive error messages. Before you install the retail or upgrade version of Windows 98 on your computer, check with the hardware manufacturer and verify that there are no known issues. Also, if your current version of Windows was preinstalled on your computer and was bundled with a software package that is on a Restore CD-ROM, you may not be able install the programs that are on the Restore CD-ROM. If this is the case, use the hardware manufacturer's Restore CD-ROM to install Windows 95 and the included programs first, and then run Setup from the Windows 98 Upgrade version. View your original hardware documentation if you are not sure how to run the Restore CD-ROM.WARNING: When you run the Restore CD-ROM, it may delete all of the data on your hard disk.Real-Mode CD-ROM SupportThe Windows 98 Startup disk contains generic CD-ROM drivers that work with most CD-ROM drives. The Windows 98 Startup disk contains generic, real-mode ATAPI CD-ROM and small computer system interface (SCSI) drivers that can enable CD-ROM drives after you boot from the Windows 98 Startup disk. These CD-ROM drivers are not guaranteed to work with all CD-ROM drives. They may work as a replacement driver if the real-mode CD-ROM drivers that are included with your CD-ROM drive are not available. If these drivers do not work with your CD-ROM drive, view the documentation that is included with your hardware, or contact your hardware manufacturer.How to Prepare the Hard Disk for the Windows 98 Installation ProcedureWARNING: The following information applies to preparing an empty hard disk for the installation of Windows 98. If you use the following steps on a hard disk that is not empty, all of the data that is on that hard disk is deleted.Before you install Windows 98 on an empty hard disk, you must first create a primary partition and then format a file system on that partition. Each allocated space on the hard disk (primary partition or logical drive) is assigned a drive letter. Windows 98 supports the FAT16 and FAT32 file systems. When you run the Fdisk tool on a hard disk that is larger than 512 MB, you are prompted to choose a file system.The FAT16 file system has a maximum of 2 gigabytes (GB) for each allocated space, or drive letter. For example, if you use the FAT16 file system and you have a 6-GB hard disk, you can have three drive letters (C, D, and E), each with 2 GB of allocated space.The FAT32 file system supports drives up to 2 terabytes in size and stores files on smaller sections of the hard disk than does the FAT16 file system. This results in more free space on the hard disk. The FAT32 file system does not support drives that are smaller than 512 MB. For additional information about the FAT32 file system, click the article numbers below to view the articles in the Microsoft Knowledge Base:SystemMaximum Partition Size Using FAT16 File System More information about file systems is also available in the "Getting Started" manual that is included with the Windows 98 CD-ROM.For additional information about the Fdisk tool, click the article number below to view the article in the Microsoft Knowledge Base:The Four Steps Needed to Make a Hard Disk UsableHow to Partition the Hard DiskAfter you decide which file system you want to use, run the Fdisk tool:1.Insert the Windows 98 Startup disk in the floppy disk drive, and then restart your computer.2.When the Microsoft Windows 98 Startup menu is displayed, choose the Start computer without CD-ROM support option, and then press ENTER.3.At a command prompt, type fdisk, and then press ENTER.4.If the hard disk is larger than 512 MB, you receive the following prompt:Your computer has a disk larger than 512 MB. This version of Windows includes improved support for large disks, resulting in more efficient use of disk space on large drives, and allowing disks over 2 GB to be formatted as a single drive.IMPORTANT: If you enable large disk support and create any new drives on this disk, you will not be able to access the new drive(s) using other operating systems, including some versions of Windows 95 and Windows NT, as well as earlier versions of Windows and MS-DOS. In addition, disk utilities that were not designated explicitly for the FAT32 file system will not be able to work with this disk. If you need to access this disk with other operating systems or older disk utilities, do no enable large drive support.Do you wish to enable large disk support (Y/N)? If you want to use the FAT32 file system, press Y, and then press ENTER. If you want to use the FAT16 file system, press N, and then press ENTER.5.After you press ENTER, the Fdisk Options menu is displayed. Press 1 to select the Create DOS partition or Logical DOS Drive option, and then press ENTER.6.Press 1 to select the Create Primary DOS Partition option, and then press ENTER.7.After you press ENTER, you receive the following prompt:Do you wish to use the maximum available size for primary DOS partition?FAT32 File System:a. If you chose the FAT32 file system in step 4 and you want all of the space on the hard disk to be assigned to drive C, press Y, and then press ENTER.b. Press ESC, and then press ESC to quit the Fdisk tool and return to a command prompt.c. Skip to step 10.FAT16 File System:a. If you chose the FAT16 file system in step 4, and you want the first 2 GB on the hard disk to be assigned to drive C, press Y, and then press ENTER.b. Press ESC to return to the Options menu, and then skip to step i.c. If you want to customize the size of the partitions (the logical drives) on the hard disk, press N, and then press ENTER.d. A prompt is displayed for you to type the size that you want for the primary partition in megabytes or percent of disk space. Note that for a Windows 98-based computer, Microsoft recommends that you make the primary partition at least 500 MB. Type the size of the partition that you want to create, and then press ENTER.e. Press ESC to return to the Options menu.f. Press 2 to select the Set active partition option, and then press ENTER.g. When you are prompted to type the number of the partition that you want to make the active partition, press 1, and then press ENTER.h. Press ESC to return to the Options menu.i. To assign drive letters to the additional space on the hard disk:1.Press 1, and then press ENTER.2.Press 2 to select the Create Extended DOS Partition option, and then press ENTER.3.The option that appears displays the maximum space that is available for the extended partition. You can adjust the size of the partition or you can use the default size. Note that the default maximum space is recommended, but the space can be divided between multiple drive letters. Type the amount of space that you want, press ENTER, and then press ESC.4.The Create Logical DOS Drive(s) in the Extended DOS Partition menu is displayed. This is the menu that you use to assign the remaining hard disk space to the additional drive letters. Type the amount of space that you want to assign to the next drive letter at the Enter logical drive size in Mbytes or percent of disk space (%) prompt, and then press ENTER.5.A table that lists the drive letter that you created and the amount of space that is on that drive is displayed. If there is still free space on the hard disk, it is displayed near the bottom of the table. Repeat steps 1 through 4 until you receive the following message:All available space in the Extended DOS Partition is assigned to local drives6.After you receive this message, press ESC, and then press ESC to quit the Fdisk tool and return to a command prompt.8.After you create the partitions, restart you computer with the Windows 98 Startup disk in the floppy disk drive.9.When the Windows 98 Startup menu is displayed, choose the Start computer without CD-ROM support option, and then press ENTER.10.When a command prompt is displayed, type format c:, and then press ENTER.NOTE: If you receive a "Bad command or file name" message, you may need to extract the Format.com utility to your Startup disk. To do this, type the following command at a command prompt, and then press ENTER:extract ebd.cab format.comAfter the Format.com utility is extracted to your Startup disk and a command prompt is displayed, type format c:.11.When you successfully run the Format.com utility, you receive the following prompt:WARNING, ALL DATA ON NON-REMOVABLE DISK DRIVE C: WILL BE LOST!Proceed with Format (Y/N)? Press Y, and then press ENTER to format drive C.12.After the format procedure is finished, you receive the following prompt:Volume label (11 characters, ENTER for none)? This is an optional feature that you can use to type a name for the hard disk. Type an 11-character name for the drive, or leave it blank, and then press ENTER.13.Repeat steps 10 through 13 for any additional drive letters that you created in step i.How to Install Windows 98After you partition and format your hard disk, you can install Windows 98:1.Insert the Windows 98 Startup disk in the floppy disk drive, and then restart your computer.2.When the Windows 98 Startup menu is displayed, choose the Start computer with CD-ROM support option, and then press ENTER.3.If CD-ROM support is provided by the generic drivers on the Startup disk, you receive one of the following messages, where X is the drive letter that is assigned to your CD-ROM drive:Drive X: = Driver MSCD001Drive X: = Driver OEMCD001 NOTE: If your CD-ROM drive is not available after you boot from the Windows 98 Startup disk, install the CD-ROM drivers that are included with your CD-ROM drive. For information about how to obtain and install the most current driver for your CD-ROM drive, view the documentation that is included with your device, or contact your hardware manufacturer.4.Insert the Windows 98 CD-ROM in the CD-ROM drive, type the following command at a command prompt, and then press ENTERX:\setupwhere X is the drive letter that is assigned to your CD-ROM drive.5.When you receive the following message, press ENTER, and then follow the instructions on the screen to complete the Setup procedure:Please wait while the Setup initializes. Setup is now going to perform a routine check on your system. To continue press Enter.
Determine Which Product to UseTo install Windows 98, you must have one of the following products: •The "Microsoft Windows 98 Upgrade" product. This upgrade product is available on CD-ROM. When you use the Windows 98 Upgrade version, you must have a copy of the previous version of Windows on CD-ROM or on floppy disks for the compliance-check procedure during Setup. Make sure that you have your qualifying version of Windows on CD-ROM or on floppy disks before you run Setup. Note that you must also have a Windows 98 Startup disk to install this product.For additional information about how to create a Windows 98 Startup disk, click the article number below to view the article in the Microsoft Knowledge Base:How to Create a Windows 98 Startup Disk that Supports FAT32•The "Microsoft Windows 98 for PCs Without Windows" product. This version is available on CD-ROM. A Windows 98 Startup disk is included with the product.Minimum Hardware Requirements to Install Windows 98The minimum hardware requirements include:•486DX 66-MHz or faster processor (Pentium recommended)•16 megabytes (MB) of memory (24 MB recommended)•195 MB of free hard disk space (the required space may vary from 120 MB to 295 MB, depending on your computer's configuration and the options you choose to install)•CD-ROM or DVD-ROM drive•3.5-inch high-density floppy disk drive•Video adapter and monitor that support VGA or higher resolution•Microsoft Mouse or compatible pointing deviceFor additional information about the minimum hardware requirements, click the article number below to view the article in the Microsoft Knowledge Base:Minimum Hardware Requirements for Windows 98System Updates, Device Drivers, and Other ConsiderationsCMOS Antivirus UtilityIt is important to disable any CMOS antivirus utility that is enabled on your computer before you run Setup. If you are not sure if this feature is enabled on your computer, view the documentation that is included with your computer, or contact the computer manufacturer.Drive Overlay SoftwareIf your computer uses drive overlay software to enable large hard disk support, the drive overlay software must be installed before you install Windows 98. To install the drive overlay software, view the documentation that is included with the software or contact the software manufacturer.System Updates and Device DriversTo ensure that your hardware and software is compatible with Windows 98, verify that you have the latest drivers, Basic Input Output System (BIOS), or patches for your hardware and software before you run Setup.If your computer uses proprietary hardware and you try to install Windows 98 on a clean hard disk, you may receive error messages. Before you install the retail or upgrade version of Windows 98 on your computer, check with the hardware manufacturer and verify that there are no known issues. Also, if your current version of Windows was preinstalled on your computer and was bundled with a software package that is on a Restore CD-ROM, you may not be able install the programs that are on the Restore CD-ROM. If this is the case, use the hardware manufacturer's Restore CD-ROM to install Windows 95 and the included programs first, and then run Setup from the Windows 98 Upgrade version. View your original hardware documentation if you are not sure how to run the Restore CD-ROM.WARNING: When you run the Restore CD-ROM, it may delete all of the data on your hard disk.Real-Mode CD-ROM SupportThe Windows 98 Startup disk contains generic CD-ROM drivers that work with most CD-ROM drives. The Windows 98 Startup disk contains generic, real-mode ATAPI CD-ROM and small computer system interface (SCSI) drivers that can enable CD-ROM drives after you boot from the Windows 98 Startup disk. These CD-ROM drivers are not guaranteed to work with all CD-ROM drives. They may work as a replacement driver if the real-mode CD-ROM drivers that are included with your CD-ROM drive are not available. If these drivers do not work with your CD-ROM drive, view the documentation that is included with your hardware, or contact your hardware manufacturer.How to Prepare the Hard Disk for the Windows 98 Installation ProcedureWARNING: The following information applies to preparing an empty hard disk for the installation of Windows 98. If you use the following steps on a hard disk that is not empty, all of the data that is on that hard disk is deleted.Before you install Windows 98 on an empty hard disk, you must first create a primary partition and then format a file system on that partition. Each allocated space on the hard disk (primary partition or logical drive) is assigned a drive letter. Windows 98 supports the FAT16 and FAT32 file systems. When you run the Fdisk tool on a hard disk that is larger than 512 MB, you are prompted to choose a file system.The FAT16 file system has a maximum of 2 gigabytes (GB) for each allocated space, or drive letter. For example, if you use the FAT16 file system and you have a 6-GB hard disk, you can have three drive letters (C, D, and E), each with 2 GB of allocated space.The FAT32 file system supports drives up to 2 terabytes in size and stores files on smaller sections of the hard disk than does the FAT16 file system. This results in more free space on the hard disk. The FAT32 file system does not support drives that are smaller than 512 MB. For additional information about the FAT32 file system, click the article numbers below to view the articles in the Microsoft Knowledge Base:SystemMaximum Partition Size Using FAT16 File System More information about file systems is also available in the "Getting Started" manual that is included with the Windows 98 CD-ROM.For additional information about the Fdisk tool, click the article number below to view the article in the Microsoft Knowledge Base:The Four Steps Needed to Make a Hard Disk UsableHow to Partition the Hard DiskAfter you decide which file system you want to use, run the Fdisk tool:1.Insert the Windows 98 Startup disk in the floppy disk drive, and then restart your computer.2.When the Microsoft Windows 98 Startup menu is displayed, choose the Start computer without CD-ROM support option, and then press ENTER.3.At a command prompt, type fdisk, and then press ENTER.4.If the hard disk is larger than 512 MB, you receive the following prompt:Your computer has a disk larger than 512 MB. This version of Windows includes improved support for large disks, resulting in more efficient use of disk space on large drives, and allowing disks over 2 GB to be formatted as a single drive.IMPORTANT: If you enable large disk support and create any new drives on this disk, you will not be able to access the new drive(s) using other operating systems, including some versions of Windows 95 and Windows NT, as well as earlier versions of Windows and MS-DOS. In addition, disk utilities that were not designated explicitly for the FAT32 file system will not be able to work with this disk. If you need to access this disk with other operating systems or older disk utilities, do no enable large drive support.Do you wish to enable large disk support (Y/N)? If you want to use the FAT32 file system, press Y, and then press ENTER. If you want to use the FAT16 file system, press N, and then press ENTER.5.After you press ENTER, the Fdisk Options menu is displayed. Press 1 to select the Create DOS partition or Logical DOS Drive option, and then press ENTER.6.Press 1 to select the Create Primary DOS Partition option, and then press ENTER.7.After you press ENTER, you receive the following prompt:Do you wish to use the maximum available size for primary DOS partition?FAT32 File System:a. If you chose the FAT32 file system in step 4 and you want all of the space on the hard disk to be assigned to drive C, press Y, and then press ENTER.b. Press ESC, and then press ESC to quit the Fdisk tool and return to a command prompt.c. Skip to step 10.FAT16 File System:a. If you chose the FAT16 file system in step 4, and you want the first 2 GB on the hard disk to be assigned to drive C, press Y, and then press ENTER.b. Press ESC to return to the Options menu, and then skip to step i.c. If you want to customize the size of the partitions (the logical drives) on the hard disk, press N, and then press ENTER.d. A prompt is displayed for you to type the size that you want for the primary partition in megabytes or percent of disk space. Note that for a Windows 98-based computer, Microsoft recommends that you make the primary partition at least 500 MB. Type the size of the partition that you want to create, and then press ENTER.e. Press ESC to return to the Options menu.f. Press 2 to select the Set active partition option, and then press ENTER.g. When you are prompted to type the number of the partition that you want to make the active partition, press 1, and then press ENTER.h. Press ESC to return to the Options menu.i. To assign drive letters to the additional space on the hard disk:1.Press 1, and then press ENTER.2.Press 2 to select the Create Extended DOS Partition option, and then press ENTER.3.The option that appears displays the maximum space that is available for the extended partition. You can adjust the size of the partition or you can use the default size. Note that the default maximum space is recommended, but the space can be divided between multiple drive letters. Type the amount of space that you want, press ENTER, and then press ESC.4.The Create Logical DOS Drive(s) in the Extended DOS Partition menu is displayed. This is the menu that you use to assign the remaining hard disk space to the additional drive letters. Type the amount of space that you want to assign to the next drive letter at the Enter logical drive size in Mbytes or percent of disk space (%) prompt, and then press ENTER.5.A table that lists the drive letter that you created and the amount of space that is on that drive is displayed. If there is still free space on the hard disk, it is displayed near the bottom of the table. Repeat steps 1 through 4 until you receive the following message:All available space in the Extended DOS Partition is assigned to local drives6.After you receive this message, press ESC, and then press ESC to quit the Fdisk tool and return to a command prompt.8.After you create the partitions, restart you computer with the Windows 98 Startup disk in the floppy disk drive.9.When the Windows 98 Startup menu is displayed, choose the Start computer without CD-ROM support option, and then press ENTER.10.When a command prompt is displayed, type format c:, and then press ENTER.NOTE: If you receive a "Bad command or file name" message, you may need to extract the Format.com utility to your Startup disk. To do this, type the following command at a command prompt, and then press ENTER:extract ebd.cab format.comAfter the Format.com utility is extracted to your Startup disk and a command prompt is displayed, type format c:.11.When you successfully run the Format.com utility, you receive the following prompt:WARNING, ALL DATA ON NON-REMOVABLE DISK DRIVE C: WILL BE LOST!Proceed with Format (Y/N)? Press Y, and then press ENTER to format drive C.12.After the format procedure is finished, you receive the following prompt:Volume label (11 characters, ENTER for none)? This is an optional feature that you can use to type a name for the hard disk. Type an 11-character name for the drive, or leave it blank, and then press ENTER.13.Repeat steps 10 through 13 for any additional drive letters that you created in step i.How to Install Windows 98After you partition and format your hard disk, you can install Windows 98:1.Insert the Windows 98 Startup disk in the floppy disk drive, and then restart your computer.2.When the Windows 98 Startup menu is displayed, choose the Start computer with CD-ROM support option, and then press ENTER.3.If CD-ROM support is provided by the generic drivers on the Startup disk, you receive one of the following messages, where X is the drive letter that is assigned to your CD-ROM drive:Drive X: = Driver MSCD001Drive X: = Driver OEMCD001 NOTE: If your CD-ROM drive is not available after you boot from the Windows 98 Startup disk, install the CD-ROM drivers that are included with your CD-ROM drive. For information about how to obtain and install the most current driver for your CD-ROM drive, view the documentation that is included with your device, or contact your hardware manufacturer.4.Insert the Windows 98 CD-ROM in the CD-ROM drive, type the following command at a command prompt, and then press ENTERX:\setupwhere X is the drive letter that is assigned to your CD-ROM drive.5.When you receive the following message, press ENTER, and then follow the instructions on the screen to complete the Setup procedure:Please wait while the Setup initializes. Setup is now going to perform a routine check on your system. To continue press Enter.
Subscribe to:
Posts (Atom)


